Sunday, January 31, 2010
New Obsession...
Wow, I just discovered spoonflower.com, and I'm already experiencing the first signs of addiction. For those of you who have not yet heard of or succommed to this genius site, you may want to consider whether you have enough hours in your life available to devote to it before you click through the link.
It's a brilliant idea - the site allows you to design and purchase your own fabric, as well as fabric designed by others. It's very pricey - $11 for a fat quarter - but many of the fabrics available feel almost worth it. I haven't played around with designing my own fabric yet, but I'll admit that I've already ordered several fat quarters. I'm super curious to see what the print quality is like - watch for an update when my order arrives in the mail!!
The Cutest Little Needle Book
This has been a busy week for me professionally (see previous posts), so I haven't had much time for crafting, sewing, and blogging. I did, however, manage to complete this sweet little project.
Skebba has a tutorial for a Little Letter Needle Book, which I figured I could handle. I also really needed the stress relief that my sewing machine affords!
I only did a couple of things differently. First, I used two different felt rectangles for the "pages" of my book, because I just couldn't decide between that vibrant red-orange or the stunning teal. To make sure that both colors could be seen, I offset them slightly, then stitched down the middle with a contrasting thread.
I also chose not to topstitch mine. It lays perfectly flat even without the topstitching, because I really went to town with the iron. I think that gives the front of the envelope a cleaner, more mail-like look.
I do intend to add some kind of snap, or maybe velcro with a decorative button, but I'm not quite there yet.
If anyone out there is in need of a cute, quick needle book, this is the tutorial for you!!
Thursday, January 28, 2010
Toy Drop #3
Okay, so I did end up dropping Petra II after all. She had been sitting next to my sewing machine for a few weeks, and I realized that the thrill of getting to leave her as a toy drop was too much to resist.
I left her in a new park this time - Veteran's Memorial Field in Issaquah. There is an adorable little playground there, tucked between City Hall, a senior center, and a play field. My little hedgehog looked almost at home there - she'll be 100% at home when she goes home with a new family. :)
Monday, January 25, 2010
Sweet Encouragement
Sunday, January 24, 2010
Organizing the Mail
Saturday, January 23, 2010
Kite Paper Window Stars
Friday, January 22, 2010
Look What Came in the Mail!!
Okay, okay, this is nothing I made. But it is something yet to be made, so it does belong on this blog.
This afternoon I came home and found that a package had arrived. I opened it, and was greeted by the amazing sight above. 60 felt squares, each a different color. Oh joy! Oh rapture! Oh holy rainbow of subtle shades and tones just waiting to become something wonderful! As a wise man once said, "Taste the rainbow."
Stay tuned to see this felt become many incredible things.
Thursday, January 21, 2010
Sweater Owls
Yesterday I posted the adorable oilcloth lunch sacks that Chelsea and I made on our Monday off. Here's another project we completed that day.
The idea actually came from a gift that a co-worker's wife made for Chelsea - a stuffed owl to help out with her class' "Owl-oween" celebration in October. It was so darn cute that we decided we had to learn how. I found a fantastic tutorial on Make It and Love It (really, is there anything that Ashley makes that doesn't inspire me??) for a similar owl stuffie. Chelsea found a great sweater at Goodwill with enough fabric for each of us to make one, we both pulled out our felt stashes, and we got down to business.
Here are some reflections for the next one I make:
-We sewed the wings on last. Really, I think they should be the first thing to be sewed on, before the two sweater body pieces are joined. That way the edges get tucked and sewn into the seams nicely.
-The backs of these are a little plain. It would be cute to sew a panel of the wing felt across the back (again, before the two body pieces are sewn together), to make it look like the wings extend all the way around.
-Chelsea had the cute idea to sew a little heart on. I also think that some rick-rack "breast feathers" would add cool texture.
I haven't decided yet whether this will be a Toy Drop. I'll let you know! :)
Wednesday, January 20, 2010
A Lovely Lunch Sack
Monday Chelsea and I got together and had a crafty-sewing day at her house. One project we finished was one I had been wanting to work on for a long time - a reusable lunch bag. My Lean Cuisines will be so much more appealing coming out of this sweet, springy little sack.
The wonderful tutorial came from Tumbling Blocks, and you can find it here. I picked up this fun oilcloth at the Pacific Fabrics outlet in SoDo, and I skipped the batting and inner lining called for in the tutorial.
I can't wait for lunch tomorrow!
To see Chelsea's version, check out the photos on her fabulous blog.
Tuesday, January 19, 2010
Quick Project: Pincushion
I really needed a pincushion, preferably one that I could wear. After losing pins in the carpet while making my living room curtains, I realized I needed a quick solution. Yes, I could have just bought one, but where's the fun in that? Instead, I used Some Art Talk's simple pincushion design, with just a couple of minor modifications.
Like I said - nothing too exciting, but if you are looking to make yourself a pincushion, please check out the link I used. The method is pretty awesome!
Monday, January 18, 2010
Petra the Hedgehog
I just finished this adorable little hedgehog stuffie. In high school I had a pet hedgehog named Petra, so I named this little gal Petra II in honor of the original.
Here are a few things you should know about having a hedgehog (real) as a pet:
1. They snort when they are happy
2. They leave quills everywhere, which you will step on in bare feet
3. They have incredibly soft tummies
4. You have to clip their toenails, which is an interesting experience
Here are a few things you should know about having a hedgehog (stuffie) as a pet:
1. They snort when they are happy, if you make the snorting sound for them
2. Their quills are soft and permanently attached to their bodies
3. They have incredibly soft tummies
4. You will never have to clip their toenails, because they don't even have feet
You can get the tutorial to make your own hedgehog here, at matsutake. I did use felt, which simplified things a lot (no hemming). I'm working on some colorful ones now!
Sunday, January 17, 2010
Personalized Bathmat
Last, I turned the whole thing right-side out and top-stitched all the way around to make everything look finished. I didn't stitch around the footprints as recommended in the tutorial, because it looked hard. :)
Here's the final product!
A few lessons I learned along the way:
-Rotary cutters rock.
-Air erasable pens are nice, but mine started to disappear really fast, so I had to work quickly.
-Feet look weird, especially toes.
-Quilters are the most patient people in the world!
Saturday, January 16, 2010
Toy Drop #2
Tuesday, January 12, 2010
What I'm Working On...
Monday, January 11, 2010
Potato Head
Here's the toy for my second toy drop. I got the idea from Make It and Love It, and just love the way it turned out (hmm... I guess I made it and love it).
It was a relatively quick project - the little pieces required a lot of patience because my sewing machine skills aren't quite there yet, but I really like the way things turned out. Plus, I got to use up a lot of my scrips and scraps of felt that I had left over from other projects.
The idea is that Mr. Potato Head can provide hours of entertainment, but the plastic pieces are bulky and noisy, so this is a softer, gentler, quieter alternative for those times when parents need a silent activity for the kiddos.
I'll drop this toy as soon as it stops raining, and post the pictures.
^The lovely lady in her Sunday best.
^Excited after a trip to the dentist!
Sunday, January 10, 2010
Checkbook Cover
This was a quick project I threw together in a few minutes. The measurements and inspiration came from Prudent Baby, but I used double-sided fusible lightweight interfacing to make mine a little stiffer. I had never used interfacing before, so it was a fun challenge to figure out how to make it work.
Basically, I followed the instructions on Prudent Baby exactly, except that before I sewed I ironed the outside fabric piece (the big owl piece) to a piece of interfacing that I cut just a little bit smaller. Then I sewed everything together as described and turned the whole thing inside out (which was tricky with the stiff interfacing), then ironed again to fuse the interfacing to the yellow inside fabric. Finally, I folded the checkbook cover and ironed it again to give it a nice deep fold.
Unfortunately, just after finishing this project I realized that I was out of checks. Oh well, my new checks will be here in the next few days, so I'll get to try this out then!
Toy Drop
Valentine's Garland
Saturday, January 9, 2010
Next Fall's Pillow Covers
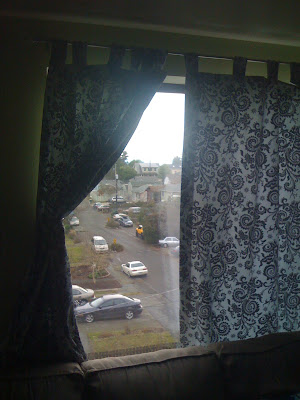
New Curtains
When we moved in, our apartment had standard-issue miniblinds, which we never bothered to replace with anything nicer or more insulated. As anyone who has cats can attest, miniblinds are no match for a feline who is determined to get to the windowsill, so needless to say the blinds were getting a bit battered and nasty looking. They also let in too much cold air in the winter and hot air in the summer.
I ended up buying way too much of the same fabric I used for my table runner, and I started looking around for a way to use up the rest of it. I tacked it up over the window just to see how it would look, and was pleasantly surprised by how much I liked it. So I went back, bought the rest of the bolt, and embarked on this adventure. I just finished them, so I haven't gotten to see them in the daylight, but I love how they warm up my living room.